IT WILL VOID YOUR WARRANTY AND IF YOU GET RED RINGED YOU WILL NOT BE ABLE TO GET A REPLACEMENT
Ok so here we go!
Required Materials:
- Knife
- Torx Screwdriver Set
- Bobby pin
- Toothpick
- Xbox
- Plexiglass
- Edging
- Spray Paint
- Double sided Tape
- Dremmel or glass cutter
- Saw
- Super Glue to reattach feet
 |
| Super glue bobby pin and torx driver |
 |
| make sure you use a torx head. looks a bit like * <- that |
 |
| This is the plexiglass and the edging |
 |
| double sided sticky tape and knife |
 |
| close up of edging |
 | |||
| this is the site where i got the glass and the edging. make sure you get 360 edging |
 |
| First turn your box upside down |
 |
| next slowly pry off the faceplate. It should come off pretty easily |
 |
| Look through the holes and you should see gray tabs that release the gray cover. |
 |
| Push them in with the bobby pin while applying gentle upward pull on the gray cover |
 |
| Keep going on alternate sides untill you get them all. You may have to remove one of the feet but you can glue them on later. Plus unless you want to paint them you should remove them too. |
 |
| flip it over so that we can do the one where the HD goes |
 | |
| Put the screwdiver though this hole and try and lever up the tab. It will probably take a bit of fishing |
 |
| Next pull uo on this end while you push more tabs though the vents. |
 |
| Heres one of those tabs |
 |
| On this one there is a tab behind the foot so just pry off the foot and save it |
 |
| Now both gray things should be off. |
 |
| lay it down and notice the 7 slot sin the back. 4 here |
 |
| and 3 here. |
 |
| use a toothpick to push them in till you hear a click and then hold them open with a screwdriver |
 |
| This is honestly the most annoying part. |
 |
| keep going |
 |
| once you have all 7 and have them wedged ipen move to the front and open these tabs. pretty easy just pry. |
 |
| Now you should see this. unscrew the ones at the corners and save the screws. they should be as long as the whole xbox. |
 | ||
| these screws. Now the bottom half of the shell should drop away. |
 |
| First use the dremel to cut a hole. stop short of the vents and where it starts to curve |
 |
| cut away some of the supports in the inside so that the glass will rest comfortably |
 |
| give it some more paint to cover up the cut marks |
 |
| paint the cut out bit or throw it out. whatever |
 |
| that metal plate can be kept but i recommend removing it. |
 |
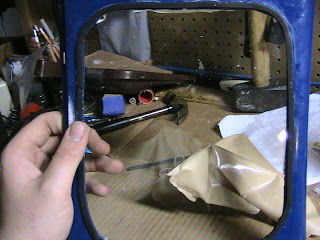
| take your shell and get ready to cut the window |
 |
| trace out the hole onto the glass |
 |
| add some corners so that it will be able to go over the lip |
 |
| use a straight edge. it works better |
 |
| still using the straight edge begin to score the glass. Use a knife and score ALOT |
 |
| once its pretty scored hit it lightly with the edge of a table under it. Line the table up with the score line and it should break easily enough. |
 |
| next put the edging on the fram |
 | |
| let it dry if you used glue then simply reassemble attaching the glass to the shell with the tape. might be a tight fit but it works. |


Dude, love it, I basically did that, if you want a pic i'll give you one, it's got the leds in it though. Get me back.
ReplyDeletedo it man ill post it up here
ReplyDelete